
Part V of this project ("Serving files with nginx") can be found here.
What is Kafka ? I'll just quote their web site :
"Kafka is a distributed, partitioned, replicated commit log service. It provides the functionality of a messaging system, but with a unique design.
What does all that mean?
First let's review some basic messaging terminology:
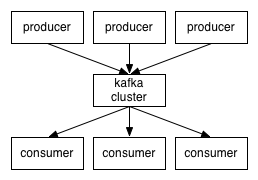
- Kafka maintains feeds of messages in categories called topics.
- We'll call processes that publish messages to a Kafka topic producers.
- We'll call processes that subscribe to topics and process the feed of published messages consumers..
- Kafka is run as a cluster comprised of one or more servers each of which is called a broker.
How will we use Kafka in snapJob :
- First, to transport logs. The node.js app will act as a producer of messages, and we will have to set the input of logstash as a kafka receiver.
- Second, to propagate configuration changes. In part III of this "saga" ("Storing and loading data with Apache CouchDB and node.js", see part "the swagger ugly validator function") , we saw that we had a problem with a configuration changes across application instances. With Kafka, if one application instance within our node.js cluster says that configuration needs to be updated, it will do it by sending a message though Apache Kafka. Every instance will act as a message consumer, and apply the configuration change when this message gets received.
Install and run :
Installation is pretty easy. First, download it, and then, copy the files in /opt. This way, you should have a "/opt/kafka_2.9.2-0.8.1.1" directory
Kafka uses Zookeeper to maintain consumers offset. By that, I mean at which position the consumer or consumer group currently is. To make an analogy, it's pretty much the same as if you borrow a book at the library and return it each time you stop reading. Next time you feel like you want to read again, you borrow the book one more time, and ask the librarian (which is our zookeeper) at which page you stopped reading last time.
So we need to start ZooKeeper (don't worry, we don't need to install it, as it is now embedded with Kafka since a few versions) :
cd /opt/kafka_2.9.2-0.8.1.1
sudo bin/zookeeper-server-start.sh config/zookeeper.properties
Next, we need to start kafka in another terminal :
cd /opt/kafka_2.9.2-0.8.1.1
sudo bin/kafka-server-start.sh config/server.properties
After the second command, you should see the first console display stuff and go crazy for a second. This is a good sign, it shows that Kafka successfully connected to zookeeper.
Let's create a topic called "logs" :
cd /opt/kafka_2.9.2-0.8.1.1
sudo ./bin/kafka-topics.sh --zookeeper localhost:2181 --create --partitions 2 --replication-factor 1 --topic logs
And another one called "conf" :
cd /opt/kafka_2.9.2-0.8.1.1
sudo ./bin/kafka-topics.sh --zookeeper localhost:2181 --create --partitions 1 --replication-factor 1 --topic conf
Note that you can see the list of your topics using the following command :
cd /opt/kafka_2.9.2-0.8.1.1
sudo ./bin/kafka-topics.sh --zookeeper localhost:2181 --describe
And if you do, you will see something like this :
Topic:conf      PartitionCount:1        ReplicationFactor:1     Configs:
        Topic: conf     Partition: 0    Leader: 0       Replicas: 0     Isr: 0
Topic:logs      PartitionCount:2        ReplicationFactor:1     Configs:
        Topic: logs     Partition: 0    Leader: 0       Replicas: 0     Isr: 0
        Topic: logs     Partition: 1    Leader: 0       Replicas: 0     Isr: 0
To test our installation, we could start a consumer that listens to the "conf" topic :
cd /opt/kafka_2.9.2-0.8.1.1
sudo bin/kafka-console-consumer.sh --zookeeper localhost:2181 --topic conf --from-beginning
... and, start a producer in another terminal :
cd /opt/kafka_2.9.2-0.8.1.1
sudo bin/kafka-console-producer.sh --broker-list localhost:9092 --topic conf
if you type something in the producer console, you should see the same thing appear in the consumer console.
Producing log messages from node.js :
In our application, we will update util/log.js to produce messages to the Kafka server. We will use kafka0.8,
So let's add the dependency to our package.json application :
{
    "name": "snapJobAPI",
    "version": "0.0.1",
    "dependencies": {
        "express": "*",
        "swagger-node-express": "*",
        "minimist":"*",
        "node-uuid":"*",
        "nodemailer":"*",
        "cradle":"*",
        "async":"*",
        "kafka0.8":"*"
    }
}
We will also add a "messageBroker.js" file in the "util" directory (the zookeeper connection string - localhost:2181 - will probably be removed from here to be part of a configuration file, but for now, we will keep it "as it"). The important stuff in this file is here :
var Kafka = require('kafka0.8')

// [...]

// Sends a simple message to kafka
this.sendMessage = function(message, topic, partition, callback) {
    var zookeeperClient = new Kafka.Zookeeper('localhost:2181');
    var serializer = new Kafka.Serializer.Json();
    var payloads = [
        {
            topic: topic,
            partition: partition,
            serializer: serializer,
            messages: [ message ]
        }
    ];
    var producer = new Kafka.Producer({
        zkClient: zookeeperClient,
        requiredAcks: 1
    }, function () {
        producer.produce(payloads, callback);
    });
};
It says we need to connect to ZooKeeper on localhost:2181, use a Json serializer, and produce a message on a specified topic.
Next, we need to update the "/util/log.js" source file. Instead of sending to logstash as we previously did in the article "part II : Managing application logs using LogStash", we now can do this :
messageBroker.sendMessage(
    {
        message: message,
        request: cleanedRequest,
        level: level,
        workerId: cluster.worker ? cluster.worker.id : undefined,
        hostname: os.hostname()
    },
'logs',
cluster.worker ? cluster.worker.id % 2 : 0,
callback);
The Json message itself is highlighted in blue, and we will publish in the topic "logs", on partition 0 if the application is launched using "node snapJob.js", and on partition 0 or 1 if launched from "node app.js" (see part IV : Scalling node.js, and ensure high availability using "cluster"). Kafka ensures messages order within a single partition. If we use 0 or the cluster worker id (if available), then we ensure that all logs will be properly ordered for each application thread. This is a nice trick.
Consuming logs from Kafka to LogStash :
-
First, see "part II : Managing application logs using LogStash" to know what logstash is, and to know how to launch it.
-
Logstash does not know how to read kafka message streams by itself. First, we need to give it a ruby gem, a plugin, to make it listen kafka. The plugin and it's documentation can be found here.
But as I know you are as lazy as I am, here are the few command lines I used to install the plugin :
wget https://github.com/joekiller/logstash-kafka/archive/v0.5.2.tar.gz

tar -zxvf v0.5.2.tar.gz

cd logstash-kafka-0.5.2

sudo cp -r /opt/kafka_2.9.2-0.8.1.1/libs /opt/logstash-1.4.2/vendor/jar/kafka_2.8.0-0.8.1/lib

sudo mkdir /opt/logstash-1.4.2/vendor/jar/kafka_2.8.0-0.8.1

sudo cp -r /opt/kafka_2.9.2-0.8.1.1/libs /opt/logstash-1.4.2/vendor/jar/kafka_2.8.0-0.8.1

sudo cp -r ./lib/* /opt/logstash-1.4.2/lib

GEM_HOME=/opt/logstash-1.4.2/vendor/bundle/jruby/1.9 GEM_PATH= java -jar /opt/logstash-1.4.2/vendor/jar/jruby-complete-1.7.11.jar --1.9 ~/logstash-kafka-0.5.2/gembag.rb ~/logstash-kafka-0.5.2/logstash-kafka.gemspec
-
Our logstash configuration file, "/opt/logstash-1.4.2/snapJpbLogs.conf", currently looks like this :
input {
 tcp { port => 28777 type=>"log" }
}
output {
 elasticsearch { host => localhost }
}

filter {
 json {
  source => "message"
 }
}
We will update it to something like this :
input {
 kafka {
  zk_connect => "localhost:2181"
  group_id => "logstash"
  topic_id => "logs"
  reset_beginning => false
  decorate_events => false
 }
}
output {
 stdout { codec => rubydebug }
 elasticsearch {
  host => localhost
  port => 9300
 }
}
The stdout is optional, but will let us see in the console the messages streaming to logstash. - Now let's run logstash :
bin/logstash -f snapJobLogs.conf web
The result will be the same as before, except this time, we will be able to filter messages by cluster worker id, by hostnames, ...
The important part is in "/util/messageBroker.js" :
var _this = this;

var zookeeperClient = new Kafka.Zookeeper('localhost:2181');

var kTransport = new Kafka.Transport({
    zkClient: zookeeperClient
});
var serializer = new Kafka.Serializer.Json();

var worker = cluster.worker ? 'consumer' + cluster.worker.id + '-' + os.hostname() : 'defaultconsumer-' + os.hostname();
var consumer = new Kafka.Consumer({
    clientId: worker,
    group: worker,
    store: new Kafka.Store.Zookeeper(kTransport),
    payloads: [
        {                                        /* see 'Payloads' section for more advanced usages */
            topic: 'conf',
            partition: [0],
            serializer: serializer            /* we will parse json, see 'Serializer' section */
        }
    ],
    transport: kTransport
}, do_consume);

function do_consume() {
    consumer.consume(
        function(msg, meta, next) {
            _this.emit(meta.topic, msg);
            /* commit offset to offset store and get next message */
            next();
        },
        function() {
        },
        function(err) {
            setTimeout(do_consume, 1000);
        }
    )
}
Initialization from the zooKeeper client to the serializer is pretty much the same as we did for the producer.
As you can see, there are 4 key points following the initilization :
- When creating the consumer, we give it a payload, which says we want to consume the partition 0 of the topic "conf" (remember ? we created only one partition for this topic). But most of all, we also pass the function do_consume to the constructor of the consumer.
- Then comes the do_consume function.
- We then "read" the topic by calling consumer.consume, which takes 3 functions in the arguments list :
- eachCallback(msg, meta, next): Executed for each message consumed msg: deserialized message meta: { topic, offset, partition } next: commit offset and get next message in message set, YOU HAVE TO CALL IT
- doneCallback(): executed at the end of message set
- endCallback(err): executed when everything has been consumed or if fetch request timed out
- The last key point is in the endCallback function, where we call the do_consume function again, after a certain amount of time.
_this.emit(meta.topic, msg);
This is the last bullet in my gun for the current article : The messageBroker is an event emitter. This means it inherits from the eventEmitter, and doing this is pretty easy in node.js :
var EventEmitter = require('events').EventEmitter;
// [...]
util.inherits(MessageBroker, EventEmitter);
To test this, I updated "/util/globals.js" to add these lines of code :
this.pushConfigurationToBroker = function(callback){
    messageBroker.sendMessage(this.configuration, 'conf', 0, callback);
};

var _this = this;
messageBroker.on('conf', function(data){
    _this.configuration = data;
    var worker = cluster.worker ? ' ' + cluster.worker.id : '';
    console.log('conf updated' + worker);
});
I also updated the 'models/test.js' source code file to call the pushConfigurationToBroker method :
var globals = require("./../util/globals");

// [...]

globals.pushConfigurationToBroker();
And now, when I click the test button in my swagger interface, I can see this :
conf updated 5
conf updated 8
conf updated 7
conf updated 1
conf updated 2
conf updated 3
conf updated 6
conf updated 4
This is the proof that configuration changes has been propagated to all of our node.js application instances.
Important note: To test the source code, you need to run the command "node app.js --masterAPIKey=somekey --port=8080" after you have deployed the swagger files from the "nginx files" folder to nginx (see "part V : Serving files with nginx"), browsed to http://localhost/api, and set the api_key to "somekey".
Pretty nice, huh ? That wasn't so hard after all...
Presentation of the project can be found here.
Source code for this application can be downloaded from here.
Next part : snapJob - Part VII : Client side javascript dependencies using Bower
Aucun commentaire:
Enregistrer un commentaire